Importing clone detection result
VisCad requires the subject system and the clone detection result you obtained by running clone detection on the subject system using the supported clone detectors.
Current you can directly import clone detection result of CCFinder, Simian, SimScan, NiCad. If you have clone detection result in RCF format (e.g., iClones result), you can also import and analyze the data in VisCad. For other clone detection tools, you need to convert the result into VisCad input file format. VisCadBeta.zip file contains an example of VisCad input file.
Make the selection
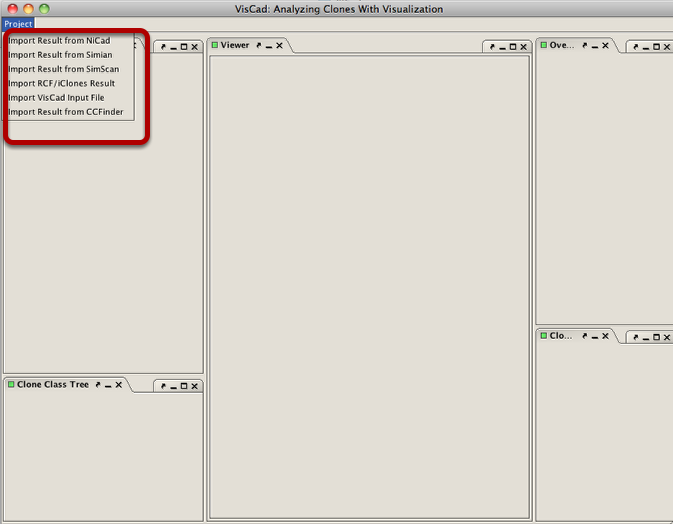
To import clone detection result or RCF data file, click on the Project menu. This opens a list of importing operations supported by VisCad.
Import clone detection result of Simian
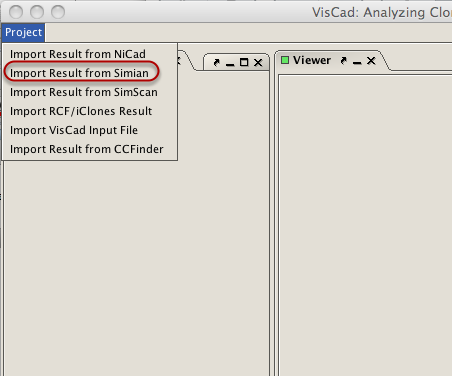
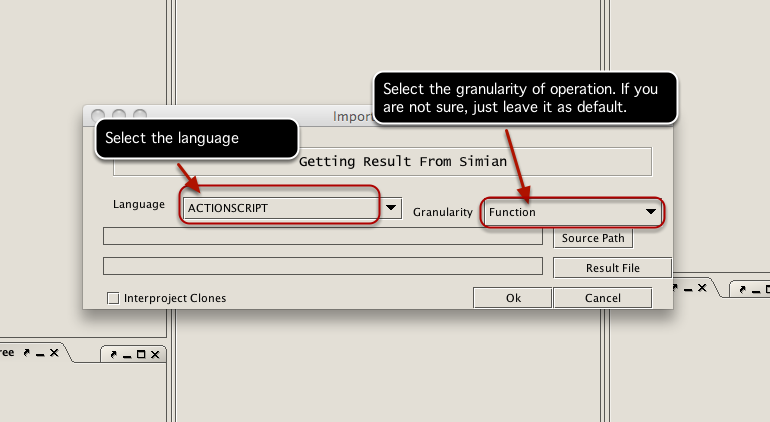
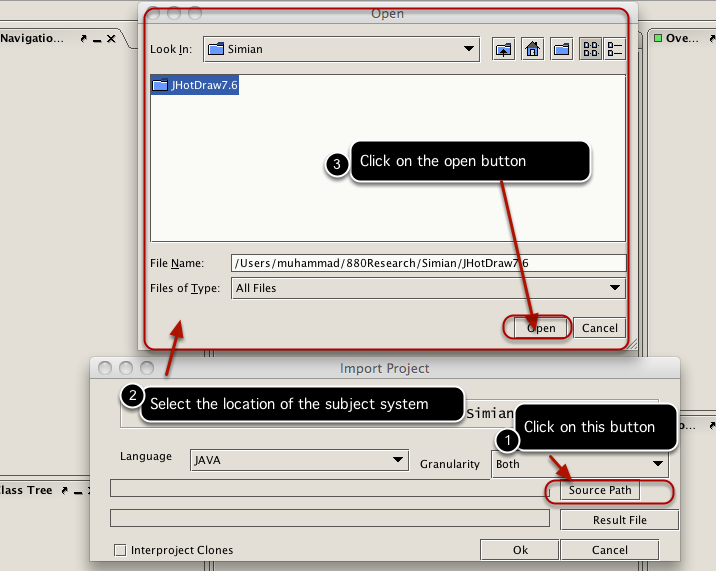
Suppose your computer contians the source code of JHotDraw(version 7.6) and located in the JHotDraw7.6 directory. You detect the clones using Simian on that directory and stores the result in jhotdrawResultSimian.txt file. To import the result, you need to click on the Project menu and select the Import Result from Simian menu item.
Select subject system
Select the clone detection result file
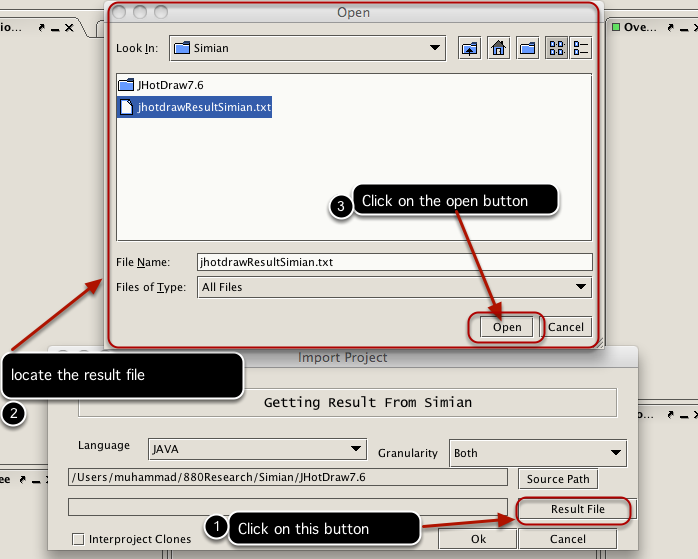
Complete the import opeation

Loading clone detection result
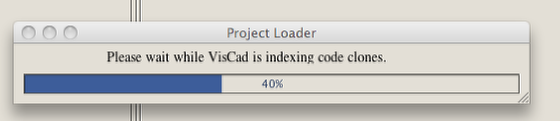
VisCad is now loading the clone detection result.
Complete the loading operation
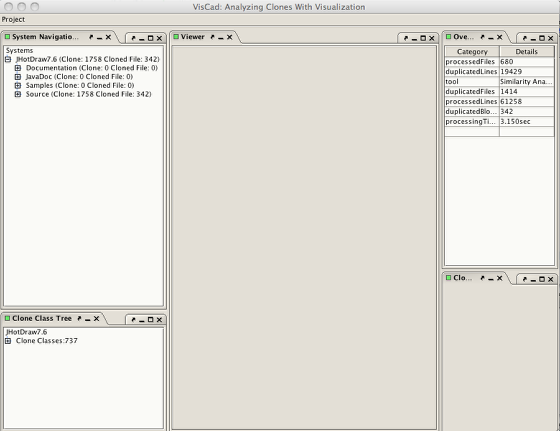
The result is loaded into VisCad.
Import result from SimScan

SimScan creates a folder that contains the output of the clone detection. A sample clone detection result (jhotdrawReportSimScan.zip) for JHotDraw (Version 7.6) is included in the VisCadBeta.zip file. You can also find the source code of the subject system in a zip file (jhotdraw-7.6.nested.zip).
Follow the steps listed below:
1. Unzip the jhotdraw-7.6.nested.zip file and rename the folder to JHotDraw7.6.
2. Unzip the jhotdrawReportSimScan.zip file. This will create a folder (jhotdrawReportSimScan) that contains the clone detection results. Put the folder in the same place where JHotDraw7.6 folder resides.
3. Select the ‘Import Result from SimScan’ menu item from the ‘Project’ menu (located on the top left of the VisCad interface). This opens a dialog to import the result.
4. Click on the Source Path button and select the source code directory (In this case, JHotDraw7.6 folder). This should be the folder on which you apply clone detection.
5. Now, click on the Result Folder button and select the clone detection result folder (In this case, jhotdrawReportSimScan).
6. Select the language of the subject system and also the granularity of clone detection. If you are not sure, you can leave them as default.
7. Now, click on the Ok button to load the subject system by VisCad. The loading time may vary depending on the size of the system.
8. You can click on the Cancel button to cancel the import operation.
Import result from NiCad
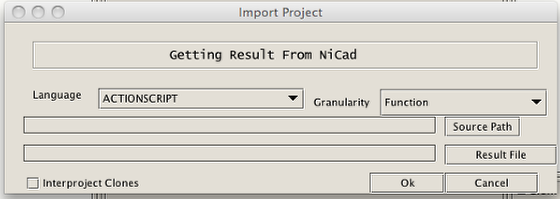
A sample clone detection result (JHotDraw7.6_functions-clones-0.3.xml) for JHotDraw (Version 7.6) is included in the zip file. You can also find the source code of the subject system in a zip file (jhotdraw-7.6.nested.zip). Clones were detected using NiCad.
Follow the steps listed below:
1. Unzip the jhotdraw-7.6.nested.zip file and rename the folder to JHotDraw7.6.
2. Put the clone detection result file in the same directory where JHotDraw7.6 folder resides.
3. Select the ‘Import Result from NiCad’ menu item from the ‘Project’ menu (located on the top left of the VisCad interface). This opens a dialog to import the result.
4. Click on the Source Path button and select the source code directory (In this case, JHotDraw7.6 folder). This should be the folder on which you apply clone detection.
5. Now, Click on the Result File button and select the clone detection result file (In this case, JHotDraw7.6_functions-clones-0.3.xml).
6. Select the language of the subject system and also the granularity of clone detection. If you are not sure, you can leave them as default.
7. Now, click on the Ok button to load the subject system by VisCad. The loading time may vary depending on the size of the system.
8. You can click on the Cancel button to cancel the import operation.
Import RCF/iClones result file
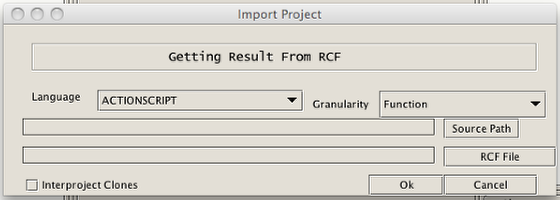
RCF is a data format that can store clone data for a number of versions of a subject system. iClones also provide clone detection result in RCF format and can be directly imported into VisCad. For this example, we have used GNU Wget. Download both the subject system and the RCF file from here. The RCF file is packaged with the source code of the subject system.
Follow the steps listed below:
1. Extract the content of the archive and rename the folder to rcfResult. You now have two folders inside the rcfResult folder. One is the wget that contains the source code of seven different versions of the system. Another one is the wget.rcf that contains the clone detection results of those systems in the RCF format.
2. Select the ‘Import RCF’ menu item from the ‘Project’ menu (located on the top left of the VisCad interface). This opens a dialog to import the result.
3. Click on the Source Path button and select the wget folder located inside the rcfResult folder.
4. Now, click on the RCF File button and select the wget.rcf file.
5. Select the language of the subject system and also the granularity of clone detection. If you are not sure, you can leave them as default.
6. Now, click on the Ok button to load all seven-subject subjects by VisCad. The loading time may vary depending on the number of subject systems.
7. You can click on the Cancel button to cancel the import operation.
Import result from CCFinder
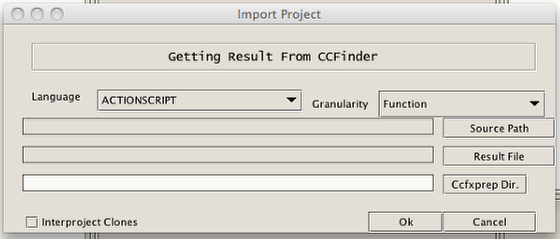
During the clone detection, CCFinder creates a directory (.ccfxprepdir). If you apply clone detection on JHotDraw7.6 directory, then the .ccfxprepdir will be created right inside that directory.
Follow the steps listed below:
1. Unzip the jhotdraw-7.6.nested.zip file and rename the folder to JHotDraw7.6. Detect clones with CCFinder and then rename the .ccfxprepdir directory to ccfxprepdir.
2. The output file is a binary one (such as a.ccfxd). You need to convert that into a text file (see here). From now, we will refer the text file as the result file.
3. Put the clone detection result file in the same directory where JHotDraw7.6 folder resides.
4. Select the ‘Import CCFinder Project’ menu item from the ‘Project’ menu (located on the top left of the VisCad interface). This opens a dialog to import the result.
5. Click on the Source Path button and select the source code directory (In this case, JHotDraw7.6 folder). This should be the folder on which you apply clone detection.
6. Now, click on the Result File button and select the clone detection result file.
7. Click on the Ccfxprep Dir. button and select the ccfxprepdir directory.
8. Select the language of the subject system and also the granularity of clone detection. If you are not sure, you can leave them as default.
9. Now, click on the Ok button to load the subject system by VisCad. The loading time may vary depending on the size of the system.
10. You can click on the Cancel button to cancel the import operation.
Import VisCad input file
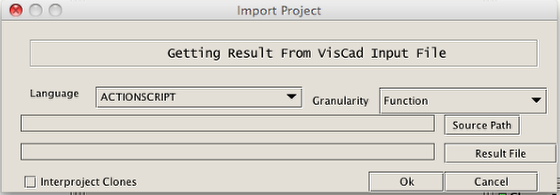
For any other clone detection tools, the result file needs to be converted to the VisCad input file format. A sample clone detection result (resultViscadInputFile.txt) for JHotDraw (Version 7.6) is included in the VisCadBeta.zip file. Clones were detected using Simian.
Follow the steps listed below:
1. Unzip the jhotdraw-7.6.nested.zip file and rename the folder to JHotDraw7.6.
2. Put the clone detection result file in the same directory where JHotDraw7.6 folder resides.
3. Select the ‘Import VisCad Input File’ menu item from the ‘Project’ menu (located on the top left of the VisCad interface). This opens a dialog to import the result.
4. Click on the Source Path button and select the source code directory (In this case, JHotDraw7.6 folder). This should be the folder on which you apply clone detection.
5. Now, click on the Result File button and select the clone detection result file (In this case, resultViscadInputFile.txt).
6. Select the language of the subject system and also the granularity of clone detection. If you are not sure, you can leave them as default.
7. Now, click on the Ok button to load the subject system by VisCad. The loading time may vary depending on the size of the system.
8. You can click on the Cancel button to cancel the import operation.